Wednesday, April 30, 2014

Chief Architect Premier X6 16.2.0.47 (x86x64)


Chief Architect Premier X6 16.2.0.47 (x86/x64)

Chief Architect Premier X6 16.2.0.47 (x86/x64) | 209.8/228.3 MB

For all aspects of residential and light commercial design. As you draw walls and place smart architectural objcts like doors and windows, the program creates a 3D model, generates a Materials List, and with the use of powerful building tools, helps produce Construction Documents with Site Plans, Framing Plans, Section Details, and Elevations.
Discover the Power of Chief Architect
Chief Architect is 3D architectural software for residential and light commercial design. Discover why millions of people use Chief Architect as the home design software product of choice for 2D and 3D design.

Building & Design Tools
Use powerful building and drafting tools to quickly create plans according to standard building practices and make the design process efficient and productive. Automatic and Manual Building tools allow you to create a variety of Roof styles, Stairs, Framing - both stick and truss, Schedules and Materials Lists for Cut, Buy and Estimating, Dimensioning, Cross-Sections, Elevations and CAD tools.

Kitchen, Bath & Interior Design
Chief Architect uses smart design objects, such as cabinets, to quickly and easily create various styles, shapes and sizes. Chief Architect partners with specific manufacturers (cabinets, appliances, doors, windows, countertops and flooring) so that styles, finishes and other product-specific design details can be accurately drawn and rendered.

3D Design and Modeling Tools
As you draw walls, the program automatically creates a 3D model and supports full 3D editing. With Chief Architect, you can design in any view for seamless and simultaneous editing between 2D & 3D. Advanced rendering provides both Photo Realistic and Artistic styles such as Line Drawing and Watercolor. An extensive 3D Library of architectural objects and tools make it easy to detail and accessorize your designs so that styles, finishes and other product-specific design details can be accurately rendered.

Chief Architect Premier X6 16.2.0.47 (x86/x64)


OS : Microsoft Windows 8.1 /8 / 7 / Vista (32 & 64 bit)
Language : English

Home Page - http://www.chiefarchitect.com/

Chief Architect Premier X6 16.2.0.47 (x86)

Chief Architect Premier X6 16.2.0.47 (x64)


How To Download: 

Click Download Now Wait 5 Seconds & Click (Skip Ad) To Download.

Download Links :

 DOWNLOAD NOW
Name: Chief.Architect.Premier.X6.16.2.0.47.x86x64.rar

Size: 209 Mb

Download from: uploadable.ch

OR

IF ABOVE LINK NOTE WORK  DOWNLOAD HERE 

OR  


OR 


+

Tuesday, April 22, 2014

How to Find and Delete Rundll Errors

STEP 1: IDENTIFY

The first thing you must do is to identify the specific rundll process. This is not a difficult task; there is a vast online process library in which you can evaluate the validity of the process that is running. When the error dialog box opens, it displays the the process name. For example, if the dialog pops up and shows you the dll error:
Error loading C:WINDOWS\ system32\ usvdgpo.dll
Visit www.processlibrary.com or simply google the dll by copying and Pasting the dll or simply type it into the search box. The results will indicate that the program is a part of trojan spyware. You can use Microsoft Process Explorer also to identify the process.
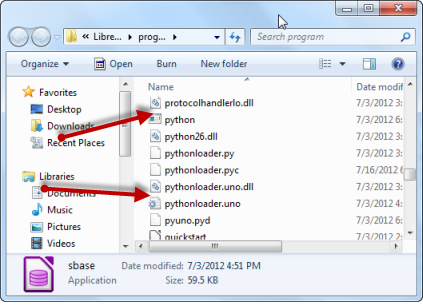
If you already know the program that the dll is attached to, you can simply go into the program folder to find the dll in question.
  • Click Start
  • Click All Programs
  • Find the Program, Right Click
  • Choose Open File Location
  • Locate the dll
Delete Computer History
It’s possible to locate the dll in the System32. You will have to open the task manager to do this. Here is how to locate the dll in the System32 folder.
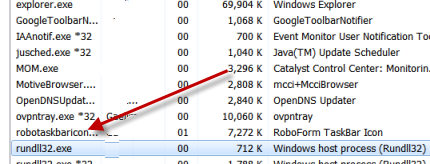
  • Click CTRL-ALT-DELETE to Open the task manager
  • Click the Process tab, scroll down to Rundll32.exe
  • Right Click Open File Location.
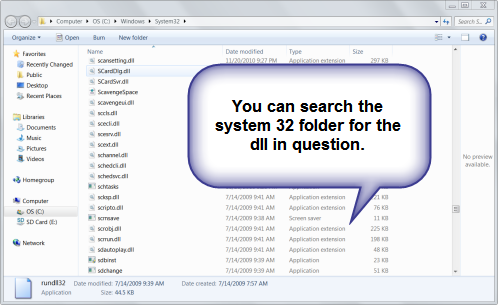
  • Search for the dll
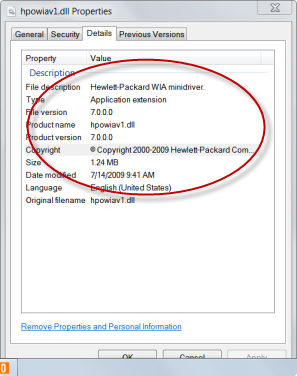
  • When you find it, Click Properties
  • Click Details to see what program runs the dll.
If the dll windows pops up saying your that its missing, Check out this these Fix Missing Rundll Message tutorial. When you find the dll. If should have a normal Windows icon. If there’s no icon, this means the dll is corrupted by malware.
Delete Computer History

STEP 2: STOP THE PROCESS (Optional)

Often you can locate the dll services in the services configuration. Find the identified service and disable it. If you only know the program attached to the dll, follow the steps for removing the program from start up. You can open up your services configuration by following instructions below:
  • Open your Start menu.
  • Click Run
  • In the command screen type: services.msc
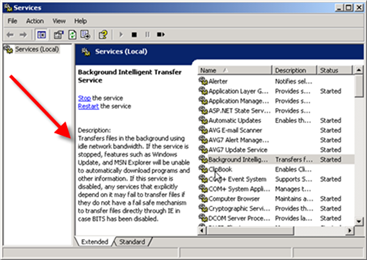
  • This will bring up the Services Management window. If you drag the mouse to one of the services. It will give you a detailed explanation of the service in question. By right clicking the individual service, you can view properties or stop it.
  • Stop the “dll”service immediately.
Delete Computer History
NOTE: Sometimes the dll process can not be stopped by the above method. In this case, remove the program from the startup configuration.
  • Click Start > Programs> Accessories
  • Click Run
  • Type Msconfig
  • Click the Service or Start up, locate the service, program or app
  • Remove it from your computer start up by deselecting it.

STEP 3: LOCATE, DELETE OR REPLACE

Now you know the application connected to the rundll. You can uninstall the program, download a new dll or delete it from the registry. This is the most certain way is to delete the error. You can use the Program CD to replace the dll after you delete it or simply re-download the dll or copy and past it.
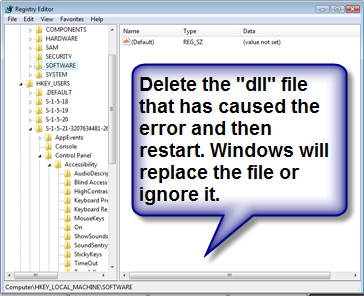
To remove it from the registry, you will have to open your Windows Registry File System. This is an extremely delicate process. You may want to use a repair program to find the file. These may be specific to the particular program. This will often fix the rundll error in question, eliminate other errors and also speed up your computer. The registry key: HKEY_LOCAL_MACHINE> SOFTWARE> Microsoft> Windows> CurrentVersion> RUN
This action will help you speed up your applications load times considerable. Here is how:
  • Click Start
  • Click Run
  • Type regedit
  • Find this registry key:
    HKEY_LOCAL_MACHINE> SOFTWARE> Microsoft> Windows> CurrentVersion> RUN
  • In the right section click:”rusvdgpo” = “%System% rundll32.exe %System% usvdgpo.dll, [RANDOM LETTERS]“
  • Delete the value and Restart.
Delete Computer History

What is RUNDLL32?

The difference between these rundll and rundll32 is 16bit and 32bit. The most important thing to remember is the Windows operating system uses 32bit dll. So when you see RUNDLL32, its an indication that it maybe a system file.

REPLACE DLL WITH WINDOWS CD

System32 files belong to Windows System files. So, you will need your Windows CD or the Windows Service Pack to replace these files. Using the Windows CD can easily fix the rundll error. If you have the Windows CD, you wont need the name of the specific System32 dll. All the corrupted or missing files will be replaced with ease. Before you perform this process, you should run your antispyware program.
  • After inserting the Windows CD, Click the CMD Prompt
    You reach the comand prompt by typing CMD into the search bar.
  • Type in your CD Drive:( D: is my CD drive)
    expand D:\i386\rundll32.ex_ C:\windows\system32\rundll32.exe
  • This will copy the files that were corrupted or missing with the original files. Hopefully these tips help you fix your RUNDLL error.
Delete Computer History

SPECIAL NOTES

rundll.exe is an essential system process. However, it has a large back door vulnerability which makes it prone to malicious purposes by an attacker allowing access to your computer from remote locations, stealing passwords, Internet banking and personal data.

Trojans are usually use this method of attack to share a process that invites other malware either more trojans or other forms of spyware. The best defense is to keep your security software up to date and account for the rundll processes on your computer.
+

How to Backup Restore App Data in Windows 8 And Windows 8.1 With Software

Windows 8 does not give the users a way to backup the data utilized within its apps. Instead, you have to rely on complicated steps to manually backup the app data. Windows 8 Apps Data Backup is a simple program that does not need to be installed. Simply download it, start it up and you can begin backing up and restoring apps in Windows 8 in minutes.
There are a lot of reasons why you may need to backup app data in Windows 8. If you uninstall an app, if an app becomes corrupt or even if you need to restore Windows 8, you will lose the data utilized in apps in the process. By backing them up in Windows 8 Apps Data Backup, you can quickly restore your apps to the way you are used to taking advantage of them every day.
OR from softpedia DOWNLOAD LINK HERE
2. Double-click the Windows 8 Apps Data Backup program.
Close all your Windows 8 apps
A pop-up will tell you not to leave Windows 8 apps open or else you will not be able to backup the information from them.
3. Click on “Backup.”
Using Windows 8 Apps Data Backup
Windows 8 Apps Data Backup will populate with all your active apps. You can then pick and choose what you want to backup by clicking the checkbox next to each app. Keep in mind that not all the apps loaded are ones you actually have access to in Windows 8. Some of them run in the background to keep other apps and processes working properly. For the best results, click “Select All.”
4. At the bottom, click “Backup Now” to start the app backup process.
By default, the Windows 8 Apps Data Backup program backs up app data as ZIP archives. This allows a large amount of data to be compressed to save space. This is especially useful if you are saving the backup on a removable drive or in the cloud. Click “Yes” to continue.
Is your apps backup a ZIP file?
You will want to select a place to save the Windows 8 apps backup archive. This can be saved anywhere on your computer or a removable drive. In order to save it to the cloud, you will have to manually upload the archive or save it in your computer’s cloud directory.
Save your Windows 8 apps data backup
Depending on how many apps you are backing up, this can take a few seconds to a couple of minutes. When finished, a pop-up will appear to let you know your backup is completed.
At any time you want to restore an apps backup, simply click “Restore” at the top of the main screen.
Restoring a ZIP backup
Windows 8 Apps Data Backup will ask if the backup is a ZIP file. Click “Yes,” then navigate to the backup.
Choosing which Windows 8 apps to restore
As long as the app is installed in Windows 8 at the time of restore, you will be able to select it to restore the data from your backup. Select the apps you want to restore, and then click “Restore Now.”
Confirming Windows 8 app data restore
You will be asked to confirm that you want to restore the app data. This will overwrite existing data for the app.
Restore complete
The restore process will take a bit longer than the backup job, so let the Windows 8 Apps Data Backup program do its job. A popup will appear the restoration is completed.
What other ways do you use to backup your app data?
+

How to Access Metro Style Apps Installation Folder in Windows 8

Windows 8 contains dozens of built-in Metro style apps. These apps run almost perfectly but, if you are a developer or regular user and want to change the core files of these app you need to go to the installation files of those apps in-order to change something. Seems simple! But, it is not. You don’t have access by default to go to the applications folder and you are denied access to that folder by Windows.


  1. Access Metro Style Apps Installation Folder in Windows 8 Step 1.jpg
    1
    Open the file explorer.
  2. Access Metro Style Apps Installation Folder in Windows 8 Step 2.jpg
    2
    Navigate to the installation directory of Windows 8 (It should be C:\)
  3. Access Metro Style Apps Installation Folder in Windows 8 Step 3.jpg
    3
    Open up the ‘program files’ folder
  4. Access Metro Style Apps Installation Folder in Windows 8 Step 4.jpg
    4
    Now, you should see an applications folder named 'WindowsApps'. If not then navigate to the ‘View’ menu and mark the ‘hidden items’ option
    • Your applications folder should be visible now.
  5. Access Metro Style Apps Installation Folder in Windows 8 Step 14.jpg
    5
    Open up the applications folder
    • You would be denied access to the folder
  6. Access Metro Style Apps Installation Folder in Windows 8 Step 6.jpg
    6
    Click ‘continue’
    • Again, you would be told ‘you have been denied permission to access this folder’
  7. Access Metro Style Apps Installation Folder in Windows 8 Step 7.jpg
    7
    Click ‘security tab’. It would be underlined
    • A pop-up dialog would open showing different options in the ‘security tab’
  8. Access Metro Style Apps Installation Folder in Windows 8 Step 8.jpg
    8
    Click ‘Advanced’
    • Another pop-up dialog box would open. Click ‘change’ against the ‘owner’
    • Another pop-up dialog box would open.
  9. Access Metro Style Apps Installation Folder in Windows 8 Step 9.jpg
    9
    Now, there you need to write down the ‘Username’ or ‘Windows Live ID’ in the text box named as ‘enter the object name to select’, which you use to log-in to Windows 8
  10. Access Metro Style Apps Installation Folder in Windows 8 Step 10.jpg
    10
    After writing the name, click ‘Check Names’
    • Your ID would be identified and if found correct you full name would be displayed along with your email in the text box.
  11. Access Metro Style Apps Installation Folder in Windows 8 Step 11.jpg
    11
    Click ‘ok’
    • In the next window again click ‘ok’
  12. 12
    Keep clicking ‘ok’ unless/until you reach the error message that you ‘have been denied access’
  13. Access Metro Style Apps Installation Folder in Windows 8 Step 13.jpg
    13
    Click ‘close’
    • You would be taken again to the ‘program files’ folder.
  14. Access Metro Style Apps Installation Folder in Windows 8 Step 14.jpg
    14
    Open up the applications folder and you would be asked for permission again
  15. Access Metro Style Apps Installation Folder in Windows 8 Step 15.jpg
    15
    Click ‘continue’
    • Your applications folder would open.
+

Saturday, April 19, 2014

Techsmith Snagit 11.4.2.263 Full Crack + Latest version

Techsmith+Snagit+11.4.2.263+Full+Crack

Techsmith Snagit 11.4.2.263 Full Version has built-in with editors menus for edit previously placed objects, capture embedded links and add interactivity to your captures. Techsmith Snagit will increase your productivity while quickly creating professional presentations and flawless documentation.
Homepage: http://www.techsmith.com/snagit/

How To Download: 

Click Download Now Wait 5 Seconds & Click (Skip Ad) To Download.


Download Links :

 DOWNLOAD NOW

Size: 67 Mb
Download from: rapidgator


OR

OR


Before Downloading Make Sure To Uncheck This

+