
How do I run Psiphon 3 for Windows?
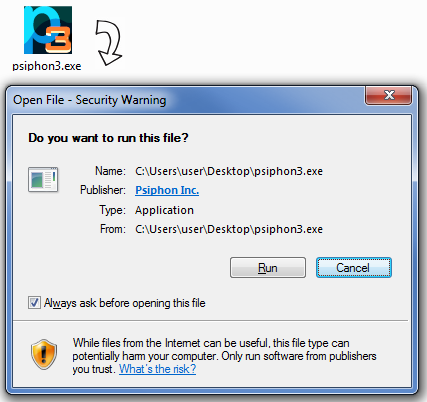
Download the client program End of this Post and run it. When you run it, you should see a security prompt showing that this program is a legitimate product of Psiphon Inc.
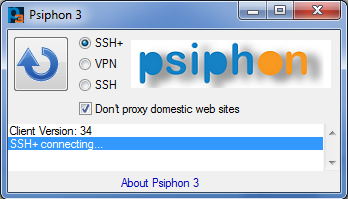
Psiphon 3 automatically starts connecting when you run it. While it is connecting, a spinning icon is displayed. You may select one of the following tunnel modes: VPN (L2TP over IPSec), SSH, or SSH+ (SSH plus obfuscation, a randomized layer on top of SSH to avoid protocol fingerprinting).
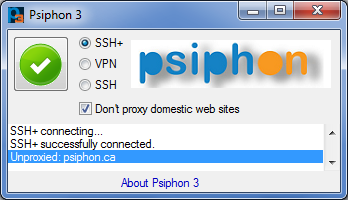
Connection to the Psiphon server is established when the green icon is displayed. In VPN mode, all of your traffic automatically tunnels through Psiphon 3.
In SSH and SSH+ modes, Psiphon 3 automatically sets the Windows system proxy settings and traffic for applications that respect these settings tunnel through Psiphon 3. These settings are respected by default by all major web browsers.
Furthermore, in SSH and SSH+ modes, Psiphon 3 offers a split tunnel option where international traffic is tunneled through the proxy and domestic traffic is not. Check the “Don’t proxy...” option to enable split tunneling. When this option is on, unproxied domains are reported in the message area.
When you close the program, Psiphon 3 automatically disconnects. You can also click on the icon to toggle the connection.
frequently asked questions
Q: Why does my Psiphon 3 IP address frequently change?
A: Your Psiphon 3 client will automatically discover new Psiphon 3 servers. When the last server used is currently unavailable, another one can be used instead.
Q: Why do I see the message "connection failed" repeating over and over?
A: If you see repeated "connection failed" messages, it means that there are no available servers that your client knows about. Try to download a new Psiphon 3 client.
Q: How do I check my current version of Psiphon 3?
A: When Psiphon 3 starts, it displays the Client Version on the first line of output.
Q: What is the file "psiphon3.exe.orig"?
A: The automatic update process in Psiphon 3 for Windows renames its old version to "psiphon3.exe.orig". Old files with the ".orig" suffix can safely be deleted.
Q: Does Psiphon 3 for Windows proxy all of my Internet traffic?
A: Only in VPN mode. After a successful connection is established in VPN mode, your entire computer’s traffic will pass through the Psiphon 3 network. In SSH modes, only applications that use the local HTTP and SOCKS proxies will be proxied.
Q: Is Psiphon 3 for Windows compatible with IE, Firefox, Safari, and Chrome web browsers?
A: Yes. In SSH modes, check your browser settings and make sure that it is configured to use the system proxy settings.
Q: Are there any port restrictions in VPN mode? Why can't I send email using my mail client in VPN mode?
A: Outbound connections from the Psiphon 3 for Windows VPN can be made only on the following ports: 53, 80, 443, 554, 1935, 7070, 8000, 8001, 6971-6999. See this discussion for more information. Mail clients cannot establish outbound connections on ports 25 and 587. See this discussion for more information.
Q: What VPN protocol is used by Psiphon 3 for Windows? Why can't I connect?
A: Psiphon uses the L2TP/IPSec VPN protocol. Your network's firewall may not allow the use of VPNs. Your home router may not be configured to pass through this VPN protocol; check your firewall settings to see that IPSec or L2TP pass-through is enabled. Your system’s IPSec Services may be disabled; check your service settings and enable this service to start automatically.
Q: I can connect to Psiphon 3 for Windows in VPN mode, but why is it so slow? Sometimes web pages don't load at all.
A: Certain networking hardware or Internet connections may cause performance problems for L2TP/IPSec which is the protocol used by Psiphon 3 in VPN mode. Try using SSH modes instead.
Q: When I connect to Psiphon 3 for Windows in VPN mode, none of my web pages load. I get error messages indicating that a domain lookup failed.
A: Psiphon 3 restricts DNS traffic to white-listed, vetted DNS servers. The Psiphon 3 client automatically configures your VPN DNS server settings. If you're getting errors related to DNS, check that you're not infected by the "DNS Changer" malware, which tries to change your DNS server settings. More info can be found here.
Q: How do I configure applications to use the Psiphon 3 tunnel in SSH modes?
A: Psiphon 3 will automatically configure your system to use a local HTTP/HTTPS proxy at 127.0.0.1:8080and a local SOCKS proxy at 127.0.0.1:1080. Windows applications that use the System Proxy Settings will automatically be proxied. You may manually configure other applications to use these local proxies. Both Psiphon 3 for Windows (SSH modes) and Psiphon 3 for Android run these local proxies.
Q: What is SSH+ mode?
A: SSH mode with the addition of an obfuscation layer on top of the SSH handshake to defend against protocol fingerprinting. A description of the protocol can be found here.
Q. In SSH mode for Psiphon 3 for Windows, I see the error message "Failed to connect to Polipo". What can I do?
A: The local HTTP proxy could not run. You might have another process running that is using the default port. Try using a different port. See the question "Q. Can I run the local HTTP proxy on a different port than 8080?"
Q. Can I run the local HTTP proxy on a different port than 8080?
A: Yes, on Windows. Click Run, and type "regedit" to open the Registry Editor. Find and open "HKEY_CURRENT_USER\Software\Psiphon3", and on the right side you will see "UserLocalHTTPProxyPort". Set it's value to the port (in Decimal) that you would like to use.
Q: I use AutoProxy. How can I tell Psiphon 3 for Windows not to configure my system proxy settings?
A: Click Run, and type "regedit" to open the Registry Editor. Find and open "HKEY_CURRENT_USER\Software\Psiphon3", and on the right side you will see "UserSkipProxySettings". Set this value to 1 and Psiphon 3 will not automatically configure the system proxy settings.

Works on Windows XP, Windows Vista, Windows 7, and Windows 8 (desktop).
How To Download:
Click On Download Link Wait 5 Seconds & Click (Skip Ad) To Download.


0 comments:
Post a Comment